In previous posts I have been describing my attempts to find a fault in the H7270 power supply of my VAXmate. After a long time studying and testing it I finally found the fault. It was a shorted diode (marked D24 in my reverse engineered schematic) on the secondary side that was part of the +28V supply to the monitor board.
The reverse engineered schematics are here. Note that they probably still contain errors, especially on the secondary side.


The pictures with the part labels are here.


The problem was that the power supply did not appear to start at all. There was no blip of the fans, no clicking from repeated attempts to start etc. However, with an oscilloscope it was possible to tell that it was attempting to start, but shutting down after only about 20ms, with the SCR (D19) on the primary side detecting an overcurrent. The trace below was taken by lifting R32 and powering the UC3842N (E3) from a bench power supply with the mains still coming in through the AC inlet. It shows the SCR triggering.
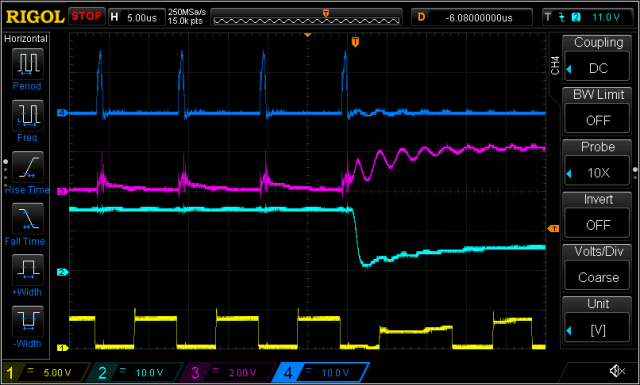
Primary Side SCR Triggering. Ch1. 555 timer. Ch2. D19 Anode. Ch3. D19 Gate. Ch4. Q1 Source.
However, I am not clear why the SCR was taking so long to trigger, in the trace the 15V peaks on the Q1 source have been going for about 15ms, so quite why it triggers the SCR only after that time is not really clear to me. It seemed to me that the peaks on Q1 source were not causing the SCR to trigger, but it turns out that they must have been the cause.
There didn’t seem to be any problem on the primary side, so on the advice of several members of the classiccmp mailing list I checked the secondary side more carefully. It was clear that the secondary side crowbar was not getting triggered, because this is the trace:
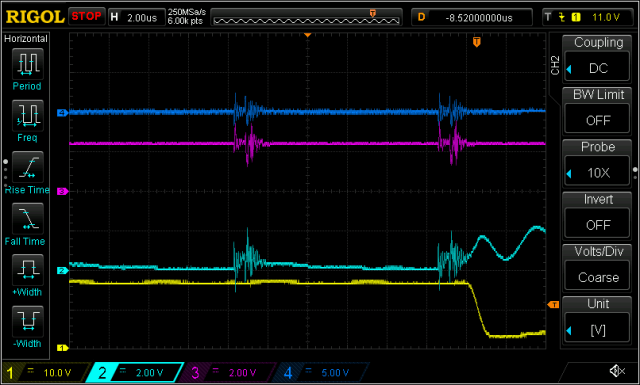
Secondary SCR. Ch1. D19 anode. Ch2. D19 gate. Ch3. Q2 anode. Ch4. Q2 gate
I desoldered and tested the rectifiers on the secondary side, and they tested fine. However, the +28V supply for the monitor board uses a rectifier constructed of discrete diodes (D23 and D24), and it turned out that D24 was shorted. I have replaced both of them to be safe.
It was a bit of a problem to get to the failed diode because it is under the large heatsink. I had to remove the heatsink, but I ended up doing it twice and the second time ended up damaging the vias a bit, so I didn’t completely remove it.
I also replaced capacitors C54, C55 and C56 in the secondary side as they had a high ESR, two of these are part of the +28V supply. Along with a few others that had a marginal or high ESR.
The complete list of replaced parts on the PSU is in the list below:
- C10, C33, C50, C51, C54, C55, C56, all because of a high ESR.
- D24, the shorted component.
- D23, just in case as it is paired with the failed D24.
- E3, a UC3842N, replaced with UC3842AN, but only due to errors damaging the original.
I was a bit concerned as to why D24 had failed. As it drives the monitor board I examined it. I could not see any visible damage, and it does not appear to present a short circuit. I checked the electrolytic capacitors on the video module and I found 5 where the ESR is marginal. They were all 15uF 16V parts, and they are marked in the picture below. Number 4 has a better ESR but I decided to replace it anyway since all the others have become marginal.
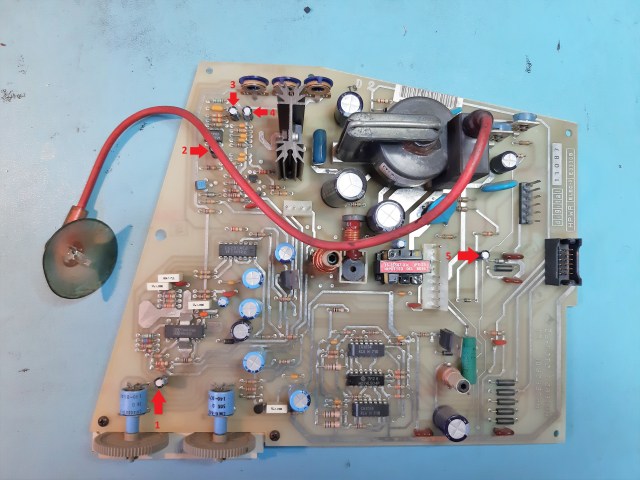
VAXmate Monitor Board With Replaced Capacitors Marked
I reassembled the machine and powered it on. It made some reassuring beeps and a few lights came on, but there was no image. A few moments later I noticed a burning smell, so I quickly powered it off. It seemed to me that the smell was coming from the monitor board, so I disconnected it and powered the machine on again. It seemed to work (apart from the video display of course), the diagnostic LEDs did not indicate an error, the floppy disk drive was accessed and it seemed to react to keypresses. There was no more burning smell.
It is clear that something has failed on the video module that caused the power supply to fail. It seemed as if the burning smell may have been coming from the flyback transformer. If that is the case then I suspect that this machine will never work again as I am unlikely to find a new flyback transformer. I took the monitor board out again and another physical examination does not show anything visibly wrong. I wasn’t completely sure that the EHT lead was making good contact with the anode of the CRT though.
I would like to acknowledge the help of all of the following people from the classiccmp mailing list for helping me to find the problem in the power supply. In alphabetical order they are:
- Matt Burke
- Rob Doyle
- Mattis Lind
Plus others on the mailing list who preferred not to be named, but they know who they are.
